

Hey friends!
I’m so excited to be working on this new series where we talk about the basics of photography. In our last blog post we talked about 4 Tips to Improve your Composition. While composition is important, lighting is the one element that really makes your photography stand out. In order to take great portraits, you need to understand how lighting works around you and how to use light to your advantage. So! Because of this I decided that my next blog should be about 7 easy ways to step up your lighting knowledge.

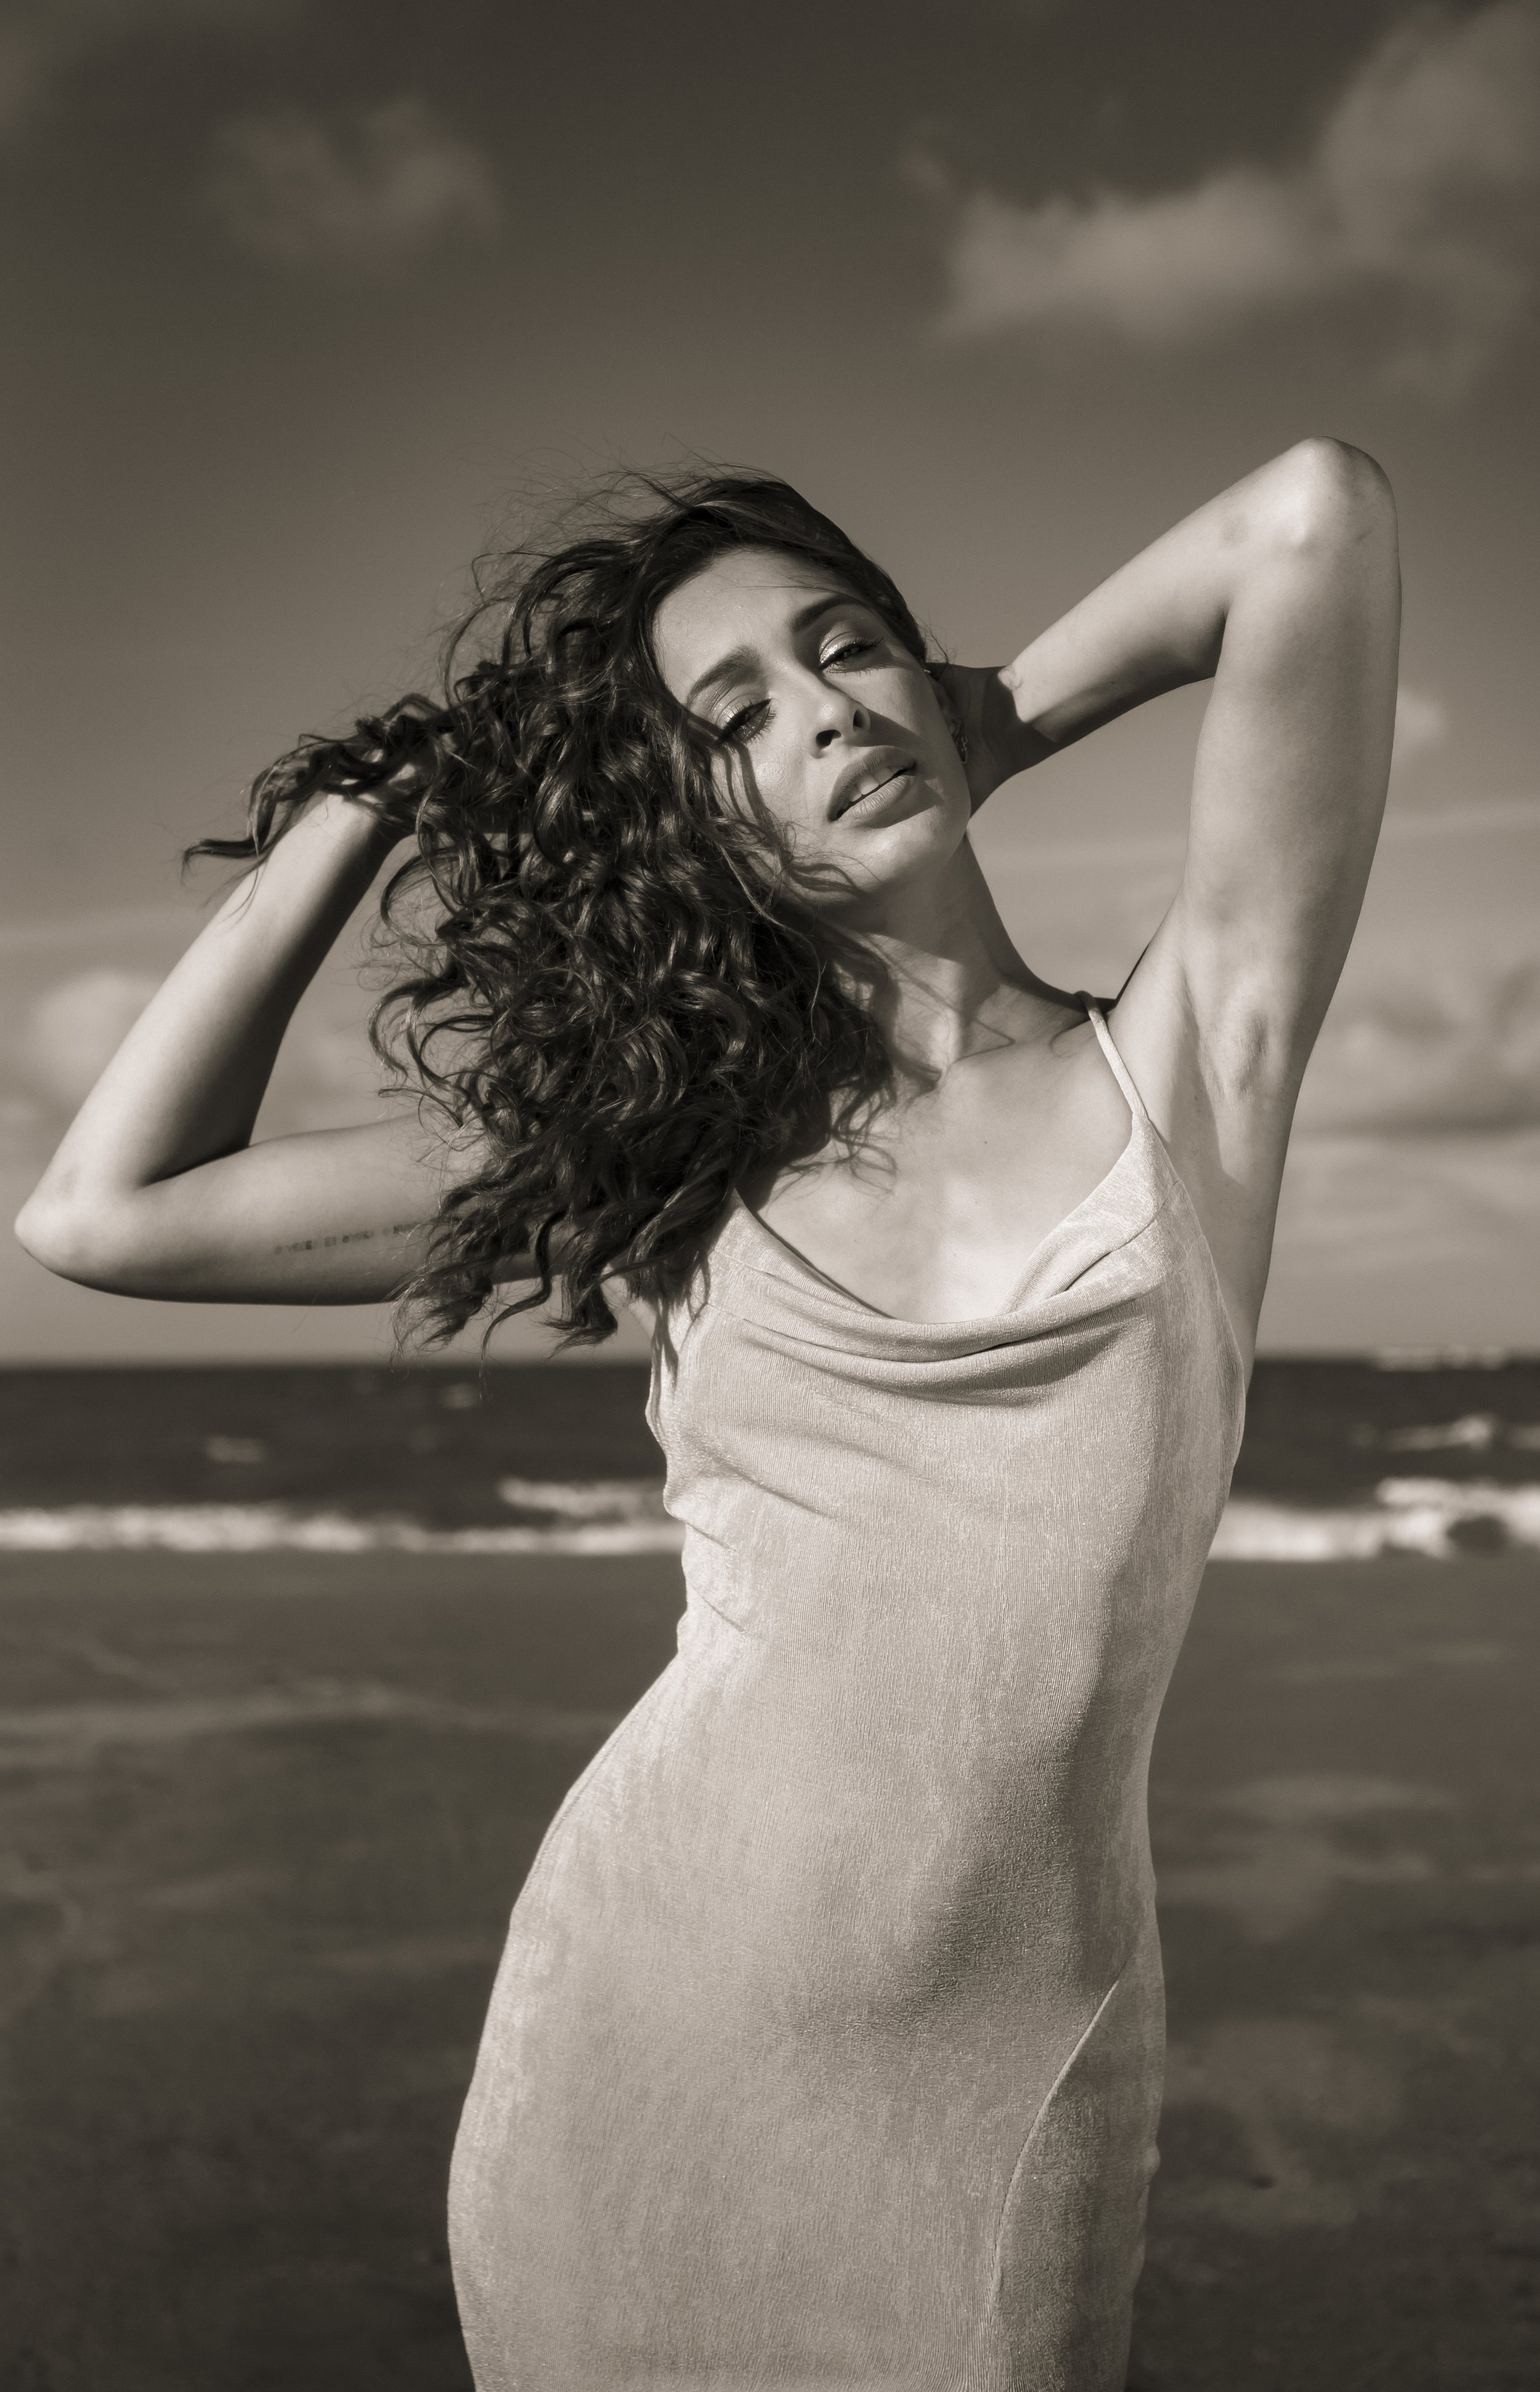
Choosing the right time to do your Portrait Photo Session can improve your lighting! This portrait was shot during evening light, which gives us soft and warm tones. Photographed by Yeya Monroig.
Natural light is your friend!
If you are looking for a cheap and reliable way to capture great portraits, then natural light is often your best choice. The Sun can be a strong and hard light source, but if you know where to place your subject and your framing you will never shoot unflattering portraits! When shooting outdoors, there are a few things you need to keep in mind.
First, it’s extremely important to know at which time you are booking your client’s photo session. I usually prefer shooting at either mornings or evenings, NEVER shoot at midday, unless that’s the look you want. The light during the morning or evening will always be softer and dimensional, since the Sun is at a lower angle the lighting will be warmer and more dynamic.
Second, try shooting with sunlight striking the back of your subject, this will give a glow effect to your subject and also a three-dimensional characteristic to your portraits. By having the Sun create a contour around your subject, the person will be easily separated from the background giving you that POP! in your portrait photography.
Third, if the sunlight gets too harsh, look for a shadow area under a tree or a shaded building. This will help you avoid harsh shadows in your subject’s face and create a more natural look, soft and appealing lighting across their face.

You can easily improve your portraits by taking advantage of the bounce board! On this portrait we can see how the photograph was enhanced on the right side of her face just by bouncing soft light where needed. Photographed by Yeya Monroig.
Use a Bounce Board
Bounce boards are one of my favorite tools for adding extra soft light to fill your subject’s shadows without using a flash. They come in different sizes and colors, and can be used to bounce light back onto your subject's face, adding a natural-looking fill light. This can be especially useful when shooting in bright sunlight, which can create harsh shadows on your subject's face.
My favorite way to use a bounce board during my portrait photography sessions is by placing my subject with their back against the sun and then using the bounce board to bounce the light coming from the Sun. This will bounce a beautiful warm soft light to the subject, while keeping the strong contour around the subject created by the sunlight.
By choosing a lower angle, we make the subject look taller and longer, giving her a power stance in the portrait. Photographed by Yeya Monroig.
Experiment with angles
The angle and composition from which you take your portrait will make or break your photograph. So, it is important to look for the perfect angle that works for your subject. Try taking your photos from above, below, or from the side to see how it affects the lighting. For example, taking a photo from a slightly higher angle from your subject’s eye line can create a pleasant and flattering look, especially for the ladies. While taking a photo from below can make your subject look powerful and dominant. Experimenting with different angles will help you find the best lighting for your subject and the mood you want to convey. Also, once you find that angle, you can adjust your lighting to enhance the framing from the angle you chose.
This Portrait Photograph was shot using sunlight, but by including a Light Diffuser to spread the Sun’s light beam, we were able to get a beautiful soft glow on her right side of the face. Photographed by Yeya Monroig.
Use a Light Diffuser
This one could be applied to exterior sunlighting, but it is mainly used for more controlled environments in interior photo sessions. So, what is a light diffuser? A light diffuser is a piece of translucent material that you can place in front of your flash or light source to soften the light and create a more natural look. When you place a light diffuser in front of your light source, the light coming from your source will spread evenly across your subject, which creates a pleasant softness in the shadows.
If you are shooting outdoors, then you have to find where the placement of the Sun is and try to cover where the light is falling around your subject. This will convert any harsh shadows created by the hard light of the Sun into soft and pleasing shadows. So, if your subject is facing the Sun, you can place your light diffuser in the right angle in order to cover the light striking them, this will create one of the most beautiful soft and “glowy” light sources you will ever work with!
The whole idea around light diffusers is that by filtering the light source through a translucent material, you are spreading the beam of light into a softer source. There are many materials to choose from and each material will have its own density which will give you different looks and softness. Light diffusers by itself is a whole blog post! Maybe we’ll write one on this topic soon.

For this Portrait Photograph the background was very important to create the depth and drama behind the subject. Photographed by Yeya Monroig.
Pay attention to background lighting
Overall the background is that element that can really make your photo pop, but for some reason most of us ignore it. I’ve talked about this in my last blog post, but having a busy background or a background with a lot of elements can be distracting in your photo and it can even break it. So, make sure to pay attention to the lighting in the background and try to position your subject so that the background light enhances the photo rather than detracts from it.This means that you need to make sure your subject is always popping out from the background. What do I mean by popping out? Well, there needs to be a light contrast between how bright your background is versus how bright your subject is against it. This is called: Contrast Ratio.
For example, if you're shooting against a dark background it’s easy enough to create separation between your subject and the background, just by creating a light contour around the subject or by placing a key-light striking them. But, if your background is a bright white element, then you need to make sure the lighting around your subject creates the needed separation either by making the subject brighter than the background or by utilizing shadows to create depth around your subject. Now you know the importance of keeping an eye in your background and how light
Practice, practice, practice!
There is no way around this! If you want to be better and improve your portrait photography skills, YOU NEED TO PRACTICE. Take as many photos as you can, experiment with different lighting setups and techniques, grab a friend and shoot their portraits or take self-portraits and practice with yourself. The more you practice, the more you'll learn about what works and what doesn't. This way you can shoot all your amateur portrait photographs as fast as possible and move quicker to your professional portrait photography skills! In order to be good at any skill, you need to go through the process of being bad at it.
Remember this!
So, lighting is a crucial aspect of portrait photography, and it’s the one thing you need to be especially aware of in order to elevate your artistry. Lighting is around us, it is constantly changing and teaching us little details that, if we are aware of them, we can apply them to our portraits. This is what will make you stand out from the bunch and excel you into being a great portrait photographer. My assignment to you will be to open your eyes and be aware of how light surrounds you, how it reflects in surfaces, how shadows are formed in a person’s face and how different it is in the morning, midday, evening and night. Noticing these gradual difference will spark new ideas in you that will inevitably reflect in your portrait photography work!
Remember, always be looking and always be practicing!
Thank you for taking the time to read this blog! I look forward to sharing more on being a portrait photographer.
Stay tuned for the next blog post!
xx, Yeya
If you liked this post and want to support me, please share this with your friends! It will greatly help me bring more information to you.